


Help Topics
Contact Us
Have feedback? Can't find your answer in our Help pages?
Prepare Comic and Kids' eBooks with Kindle Create
Contents
- Introduction to Guided View
- Create a new project
- Saving a project
- Edit an existing project
- Hotkeys
- Kindle Create interface overview
- Facing Pages and Single Pages
- Cropping and Resizing Pages
- Re-arranging pages
- Deleting, Inserting, and Replacing pages
- Adding Guided View panels to your eBook
- Previewing Guided View
- Add a Table of Contents
- Completing and uploading a project
Introduction to Guided View
Guided View (GV) is a cinematic reading experience that guides readers through a comic one panel at a time. This enables stories to be read comfortably on mobile devices like phones and tablets, where a full comic page can be difficult to read. Guided View is available on the iPhone, iPad, Android, Kindle Fire, and the Web. Readers can enter or exit Guided View at any time, and customize the reading experience via personal settings. Note: Guided View is not available on the Manga Web Reader (https://read.amazon.co.jp/).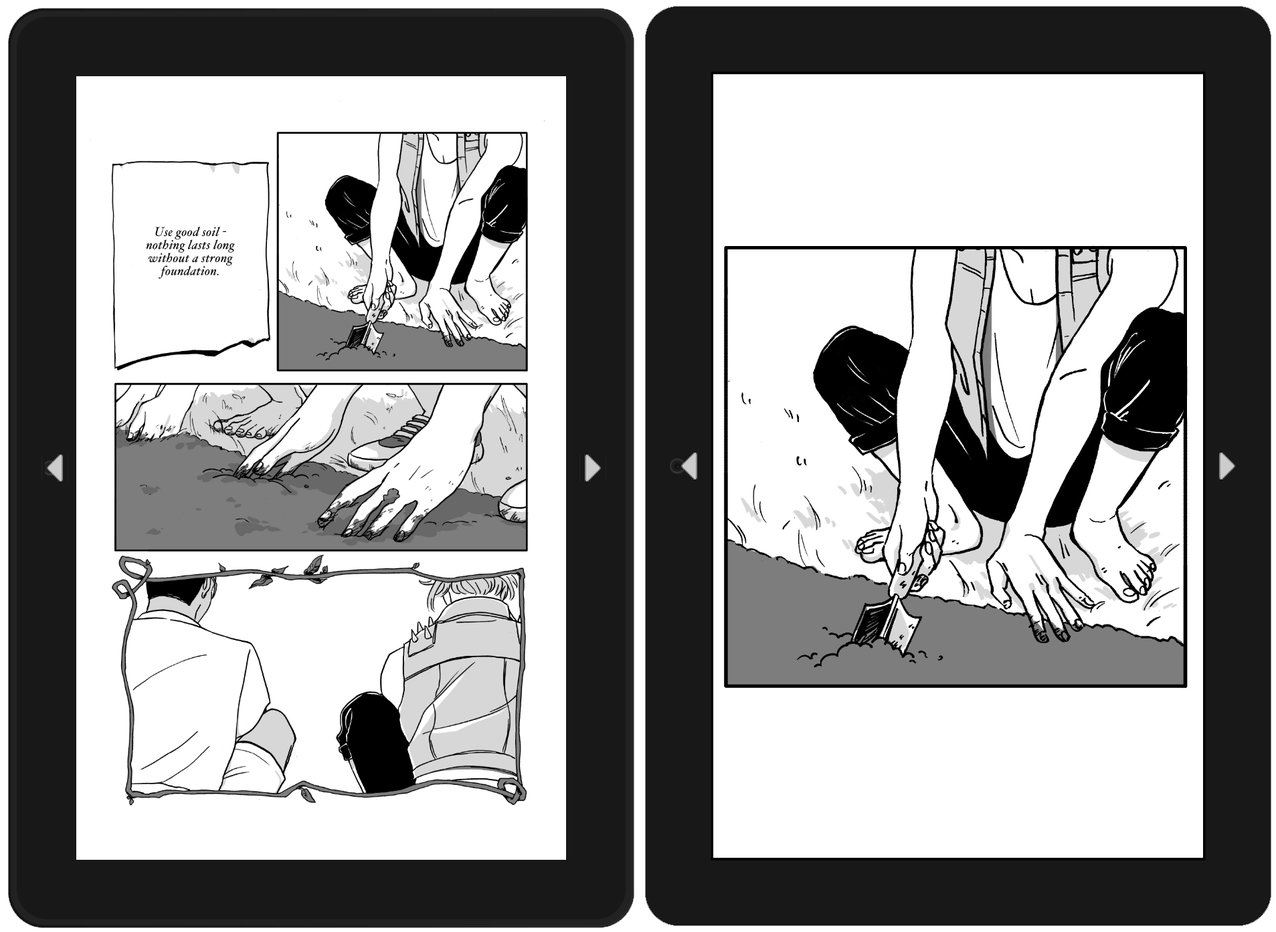
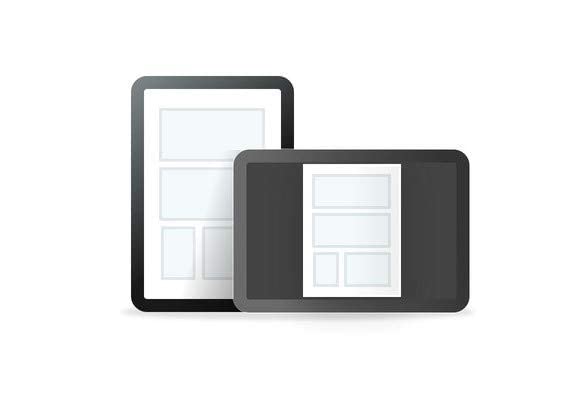
The goal of Guided View is to mimic the way a reader’s eye moves across the page. It focuses on each moment of a story by showing each panel on its own in the correct sequence. For kids’ books, Guided View enhances the narrative by calling attention to story elements in the desired order. Guided View uses “masking" to create the illusion of seamlessly isolating panels. A "mask" for a comic is a solid color that temporarily hides the rest of the page, leaving one panel as the focus. Whenever you make a selection within Kindle Create, you are defining the area that will be shown (everything inside the box) and the area that will be hidden by a masking color (everything outside the box.) Masks for kids’ books should be partially transparent to guide a young reader’s focus while preserving context in the artwork. See an example sequence below for how Guided View can be arranged on a kids’ book:

Comics and kids’ books should have text already formatted and positioned on the source image before importing it to Kindle Create. Kindle Create doesn’t offer text formatting features. Free third-party design applications are available to combine text and artwork as source images. You can use the following tools:
- Canva (Free) – A beginner-friendly design tool offering pre-made templates, easy drag-and-drop features, and customizable text options ideal for quick edits.
- PicsArt (Free) – A versatile editing app with a creative suite of filters, text effects, and stickers, great for visually appealing designs.
- GIMP (Free) – A powerful open-source graphic editor offering advanced tools for precise image editing and layering, recommended for authors with technical expertise.
- Krita (Free) – A feature-rich software designed for digital art and comics, ideal for creating intricate designs or hand-drawn elements.
- Adobe Photoshop (Paid) – A professional-grade tool with extensive text and design capabilities, perfect for full creative control and profesional results.
Note: Amazon recommends adding text to images using your preferred method before importing them into Kindle Create. Amazon does not endorse specific third-party software for image editing. The tools listed are examples, and content creators are free to use any software that meets their needs.
General Steps to Add Text to Images:
- Open your image in the application of your choice.
- Use the text tool to add desired text.
- Customize font, size, color, and position.
- Save the edited image as a JPG/JPEG file.
- Import the updated image into Kindle Create
To create your eBook with an EPUB file, see our help pages Creating Fixed-Layout Books with Image Pop-Ups or Virtual Panels and Creating Fixed-Layout Books with Text Pop-Ups.
Create a new project
To create a new illustrated book from a PDF or sequential JPEG/PNG images:- On the Kindle Create launch screen, click the Create New button. You can also launch a new project by choosing File > New Project or using the shortcut CTRL + N (CMD + N for Mac users). The Choose File dialog box is displayed. Click the Comics option.
- A screen allowing you to choose your book properties will appear. Here you can set your reading direction as Left-to-Right or Right-to-Left. Below that, an option to enable Facing Pages will be shown. If Facing Pages is enabled, your comic’s pages will appear side-by-side when viewed in landscape orientation on enabled devices.
- Click the Choose File button. If you are importing a PDF file, navigate to the PDF on your local hard drive, choose the file, and click Open. If your comic pages are in JPG or PNG format, select all the images and click Open. Note that the image will be imported in the order they are selected, so name your files sequentially for best results (e.g., comic-0001.jpg, comic-0002.jpg)
- Your comic is imported and displayed in Kindle Create.
Saving a project
Choose File > Save Project to save your imported eBook. The Save dialog box will open. Navigate to the location on your computer where you want to save the file. Enter the File name. Click Save.When you Save, Kindle Create stores all files related to your book in the folder you specify. The file ending with .kcb (KCB) is the project file that can be edited in Kindle Create. This file is required for any future updates to your book, so it is recommended that you keep a copy of it saved for all your projects.
Edit an existing project
To resume a previously saved project, go to File > Open Recent and select the project you want to edit. This will be a file ending in .kcb. You can also choose from a list of recent projects from the Recents column, displayed on the right whenever you open the Kindle Create app.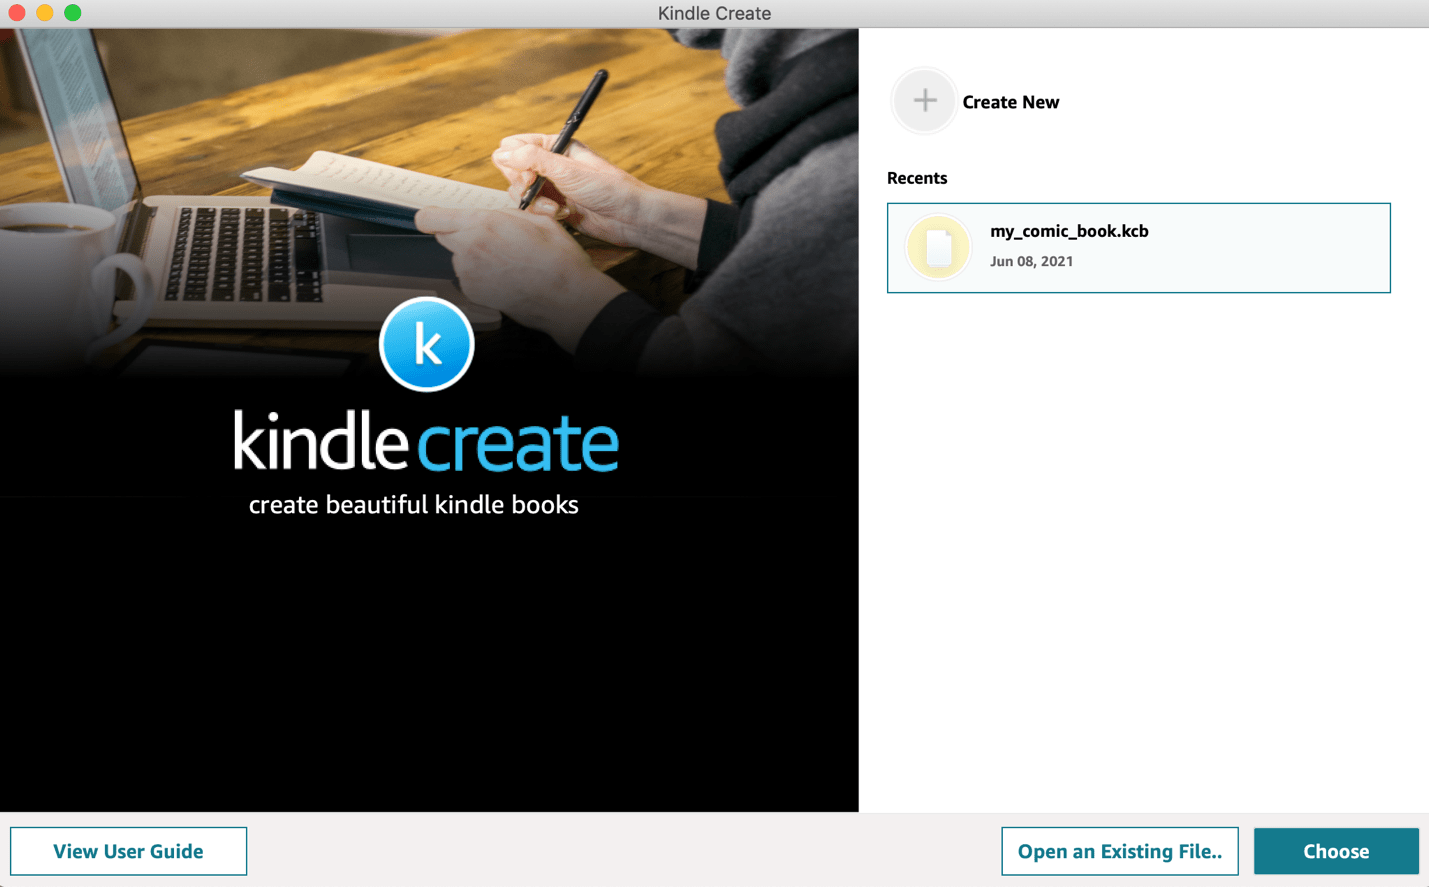
When you complete a project and click Export, Kindle Create produces a publishable file (KPF) that you can submit to Kindle. The KPF file is only used for publishing. You should continue to save the KCB file locally in case you want to make future updates. Kindle Create also allows you to export your reflowable files in EPUB format, but we recommend using the KPF to submit your files to KDP.
Hotkeys
The tables below list all hotkeys and other keyboard shortcuts that will allow you to quickly perform actions in Kindle Create.Managing projects
|
Feature |
Hotkey |
|
New project |
⌘ N |
|
Open existing project |
⌘ O |
|
Save project |
⌘ S |
|
Close project |
⌘ W |
|
Export as KPF |
⌘ + Shift + P |
View options and Canvas navigation
|
Feature |
Hotkey |
|
Zoom-In |
⌘ + |
|
Zoom-out |
⌘ - |
|
Zoom: Fit to window |
⌘ 0 |
|
Zoom: Fit to Page width |
⌘ 2 |
|
Enable/Disable Overlay |
O |
|
Reposition Canvas (without moving selections) |
Spacebar + Click & Drag |
|
Move to next and previous page within a book |
Up/Down Arrow keys |
Drawing, editing, and positioning selections
|
Feature |
Hotkey |
|
Draw new selection |
D + Click & Drag |
|
Replicate current selection |
R |
|
Panel drawing mode: Freeform |
Q |
|
Panel drawing mode: Locked Ratio Landscape |
W |
|
Panel drawing mode: Locked Ratio Portrait |
E |
|
Auto detect Panels on current page |
⌘ + D |
|
Auto detect Panels on all pages |
⌘ + Shift +D |
|
Delete current selection |
Delete/Backspace |
|
Clear all selections on the current page |
⌘ F |
|
Clear selections from all pages |
⌘ + Shift + F |
|
Edit selection size |
Click & Drag from Anchor Points |
|
Reposition selection |
Click & Drag |
|
Nudge position of selection |
⌘ + Arrow keys |
|
Move a selection along one locked axis |
Shift + Click & Drag |
|
Cycle between Next and Previous selection within a page |
Left/Right Arrow keys |
|
Eye dropper tool - change mask color of current selection |
A |
|
Eye dropper tool – change mask color of all selections on the current page |
Shift + A |
|
Toggle between black and white mask color for current selection |
C |
|
Toggle between black and white mask color for all panels on the current page |
Shift + C |
Preview Tool
|
Feature |
Hotkey |
|
Rotate device in Preview |
⌘ + Shift + R |
|
Cycle device type in Preview |
⌘ +D |
|
Jump to first page |
⌘ + Shift + F |
|
Jump to end location |
⌘ + E |
|
Jump to Location |
⌘ + L |
|
Auto Advance |
Spacebar |
Kindle Create interface overview
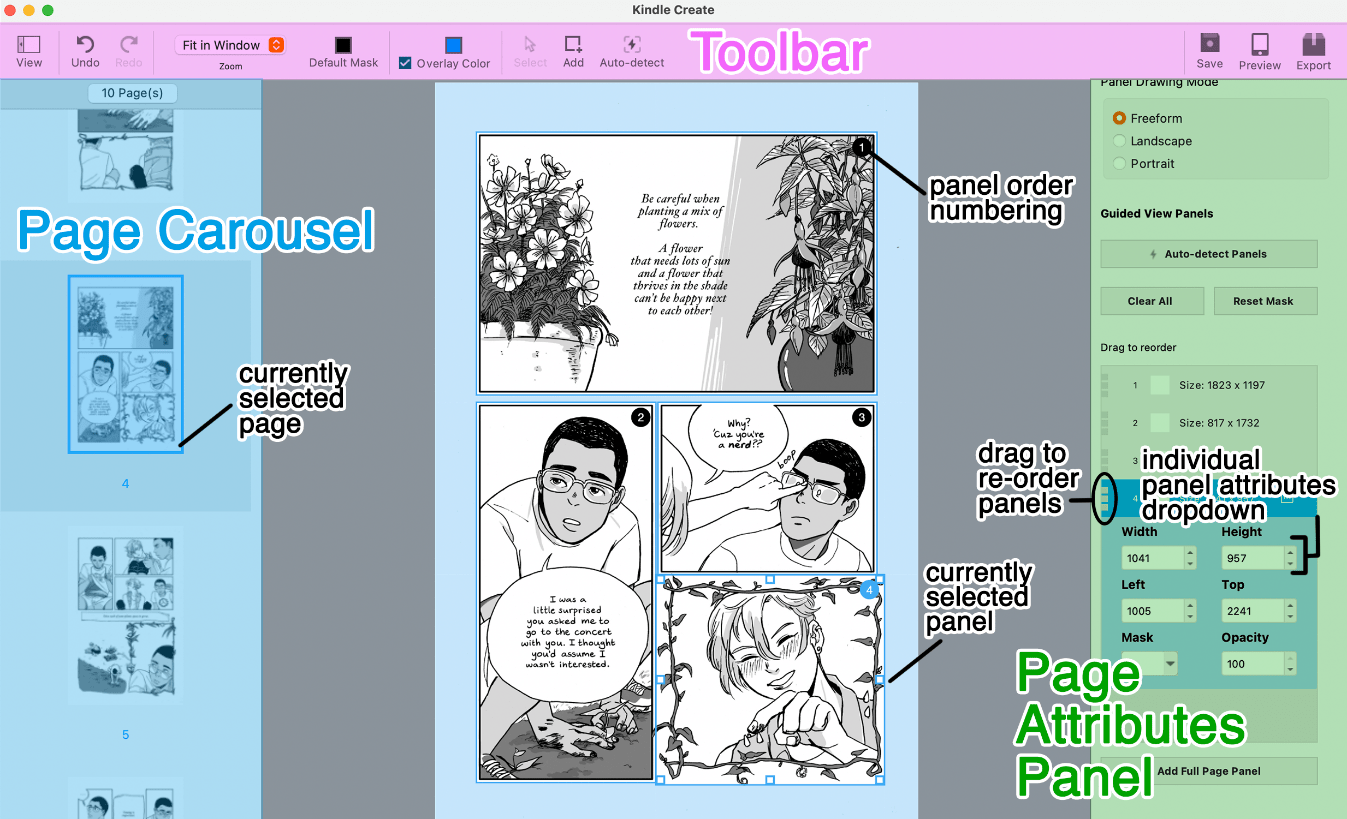
- The Page Carousel appears on the left-hand side of the window. Here you can see a preview of all pages in the project, and click individual pages to display them in the main editing area. You can hide or show the page carousel using the “View” button in the toolbar directly above it.
- At the center you will see the main editing area, which displays the current page.
- The Page Attributes panel is always visible on the right-hand side. This panel is where you can view and control all your edits to each page in Guided View, change panel drawing modes, and set pages as Facing or Single Pages.
- The Toolbar at the top of the application window has a variety of tool shortcuts for frequent use.
Facing Pages and Single Pages
You can control page type for all the pages in your comic, choosing either Facing Pages or Single Pages. This determines how a page will appear in landscape orientation on devices that support facing pages.Facing pages (Double-page spread) are shown side-by-side when reading in landscape orientation, just as they would appear if you opened to the middle of a print book. When a device is in portrait orientation, the pages will still appear individually.
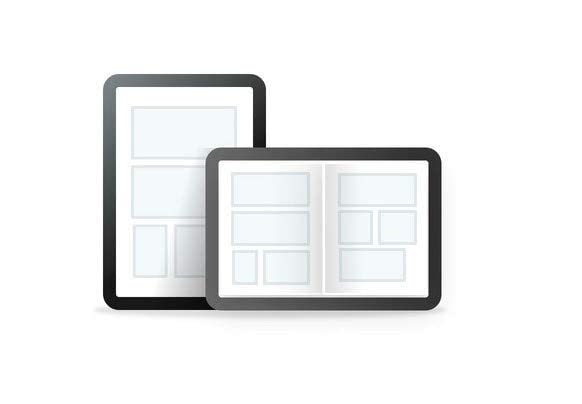
Single pages are shown individually in both landscape and portrait orientation. Pages that are wider (width greater than 1.125 times the height) are usually marked as single pages to create the best reading experience.
To set your page type for an individual page:
- Go to the Page Attributes panel in Kindle Create.
- Under Page Type, choose Single Page or Facing Page. In the page carousel on the far left, you will be able to see your changes reflected immediately after making a change.
- You can also right click or control+click any page in the left-hand carousel to access the same options.
To modify page type for all your pages:
- Go to Edit.
- Navigate to Page Type.
- Click Set All as Facing Pages or Set All as Single Pages.
Kindle Create will automatically set pages that are wider than they are tall as single pages. Additionally, pages of two different sizes cannot be set as facing pages. If you select images that are of different size and shape, you will be prompted to match them by cropping and resizing.
Tips for arranging page layout:
- For readers using devices that support facing pages, a book with pages that switch between displaying one or two at a time randomly may be distracting. For the best experience, set facing pages and single pages to closely resemble how your comic might look in print. This generally means that single pages will most often appear at the beginning or end of a book, and sometimes appear after double page spreads.
- In some comics, particularly installments of series, the last page traditionally stands on its own and is revealed after a page turn. You can set the last story page as a single page if this is an effect you want for your comic.
Cropping and Resizing Pages
- Go to Edit.
- Select Crop selected page.
- Adjust the image:
- Aspect Ratio: Adjust Aspect Ratio by choosing from the preset ratios.
- Customize: Enter a height and width or drag the corners of the image to the selected area you want.
You can also click the Crop icon in the top toolbar or right-click on the image thumbnail in the page carousel.
- Go to Edit.
- Select Resize selected page
- Enter the desired height and width.
You can also click the Resize icon in the top toolbar or right-click on the image thumbnail in the page carousel.
Re-arranging pages
By clicking and dragging pages in the page carousel, you can freely rearrange the order of pages. While dragging a page, a blue cursor will appear to indicate the position where a page will be moved. Note that re-arranging page order may affect Single vs. Facing page settings.Deleting, Inserting, and Replacing pages
From the page carousel, right-click or control-click a page to pull up a list of options. From here you can choose Insert Page(s), Delete selected page(s), and Replace selected page(s).- To Delete a page, choose Delete selected page(s). The page will immediately be removed.
- To Insert a page, choose Insert page(s) and a pop-up file navigator will appear. JPG, PNG and PDF files are supported. The files you select will appear after the page you right-clicked.
- To Replace a page, choose Replace selected (pages) and a pop-up file navigator will appear. The page (or pages) you selected will be deleted, and the new files will appear in their place.
If you get an error message while importing a file to insert or replace, check these troubleshooting tips.
Adding Guided View panels to your eBook
Selections can be added automatically or manually.
Automatic panel detection
Kindle Create includes an “auto-detect” feature that can help to quickly select comic panels. This feature works well when panels do not touch, and all panel borders can be clearly distinguished from the background color. Auto-detect is a great time-saving tool for some comics, but manual review is still necessary to correct any errors.
To use auto-detect, click the Auto-detect shortcut in the top toolbar. Or, go to Edit > Panels > Auto-detect Panels for all pages or the selected page. There is also an Auto-detect shortcut button in the Page Attributes panel. This will open a pop-up window. Within this pop up, you will see an option to “Set padding, masking color, and opacity.” Clicking this will reveal a menu where you can customize the auto-detect settings. If you do not change these settings, auto-detect will use default settings for masking color, opacity, and distance from the panel borders.
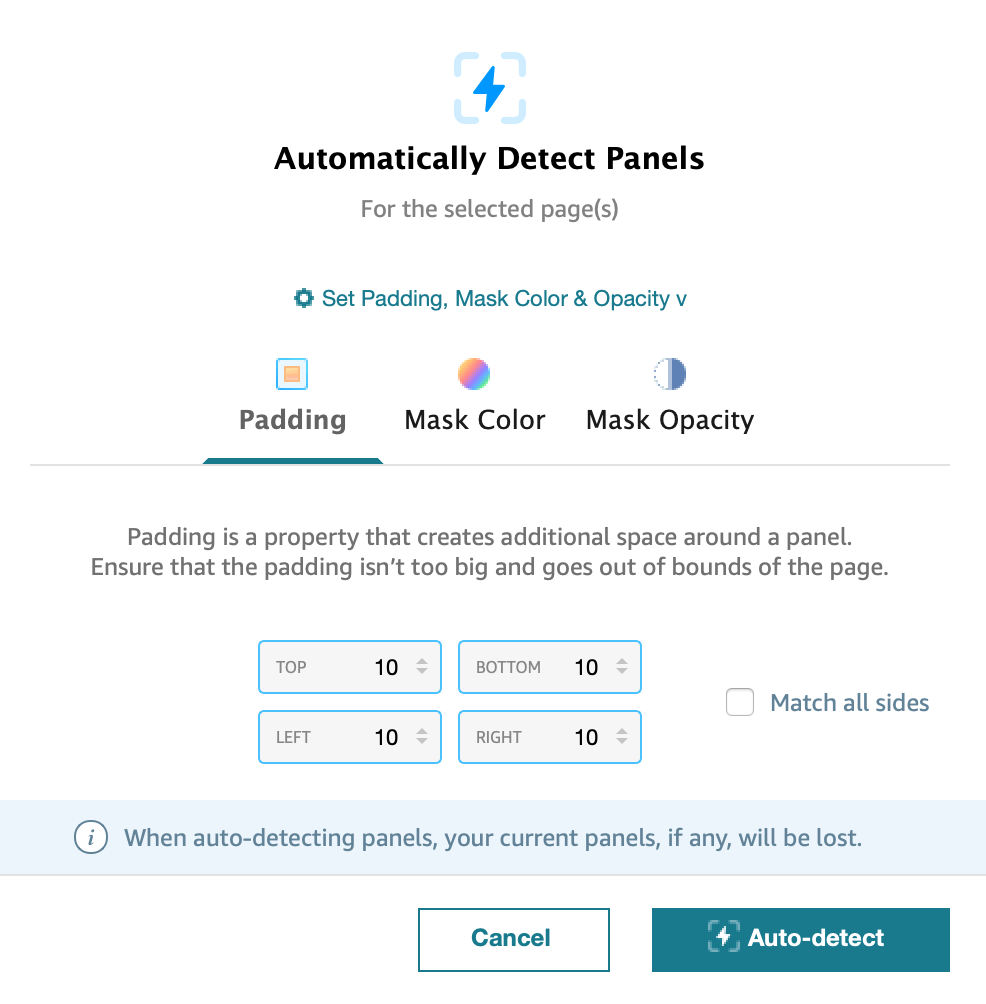
- Padding is the amount of space between the panel borders and the selection. By default, selections will be made a distance of 10 pixels away from the detected panel border on all four sides. If your comic has very thin “gutters” (the space between panels), you can decrease this number to avoid capturing pieces of other panels in your selections. If your comic has large gutters, you can include more breathing room around panels by increasing this number. Note that you can adjust the vertical and horizontal padding independently.
- Masking is the solid color that hides areas of the page outside the current selection. This is what creates the illusion of cleanly isolating one panel at a time in Guided View. Masking color should typically be matched to the color of the gutter space, or the background of the page. For more information on how to use masking, see masking color.
- Opacity controls the transparency of the masking color. We recommend that you always leave this attribute at the default 100%.
Selecting panels manually
While holding [D] (refer to Hotkeys), click and drag anywhere on the page to draw a new selection.
Each selection will appear in the Page Attributes panel, in descending order (i.e. the first panel in the reading order will appear at the top, and the last panel at the bottom). For clarity, a circle in the top right of each selection will display a number showing its place in the sequence on the page.
Modifying selections
To move or resize selections, click and drag.
By clicking and dragging anywhere in the middle of a selection, you can change its position on the page.
Clicking and dragging on any one of the eight square anchor points along the borders of a selection will allow you to adjust the size and shape. Adjusting from one of the corners allows you to adjust both width and height freely, leaving only the opposite corner anchored in place; adjusting from one of the sides moves only that side of the selection, leaving the opposite side anchored in place.
In the Page Attributes panel, each selection is represented by a row showing a masking color preview, pixel dimensions, and number in descending order of how they will appear in Guided View. Click and drag the left-hand side indicated by three squares to re-order selections.
Click any selection to reveal a dropdown of all attributes of that selection. From this dropdown you can:
- Delete the selection by clicking the trashcan icon. (You can also use the Delete key on your keyboard to remove the currently active selection at any time.)
- Manually edit Width and Height in pixels to change the size of the pane precisely.
- Manually edit Left and Top pixel coordinates to change the position of the panel precisely.
- Click Mask to choose the masking color around the panel from a variety of color options. To match the masking color exactly to the page, use [A] to activate the eyedropper tool.
- Adjust the percentage in Opacity to change the transparency of masking around the current panel.
Panel Drawing Modes
Panel Drawing Mode can be changed via options in the Page Attributes Panel, or via hotkeys [Q] (freeform), [W] (locked ratio in landscape), and [E] (locked ratio in portrait). When a Locked Ratio mode is enabled, any new selections drawn will lock to a preset ratio. Likewise, editing an existing selection while in Locked Ratio mode will also cause that selection to snap to the preset ratio. To return to freeform drawing mode at any time, simply tap [Q].
Three options for preset ratios (3:2 (default), 16:9, and 4:3) can be chosen from the Page Attributes Panel.
Locked Ratios are tools used to achieve readability and special effects within Guided View.
Deleting multiple selections
Go to Edit > Panels to find two options for mass-clearing selections. Clear panels for selected page will delete all selections on the currently selected page. Clear panels for all pages removes all existing selections from the book.
The Page Attributes panel also has a Clear All button to remove all selections from the current page.
Previewing Guided View
Use the preview tool to see how Guided View will actually appear to readers on different devices. Open the preview tool by clicking the tablet shaped icon in the upper right corner of the toolbar. This will open the preview pane in a pop-up window. within this window you can change Device Type between Tablet, Phone, and Kindle E-Reader via a dropdown in the upper left. Next to the dropdown you can also switch between horizontal and vertical orientation of the device.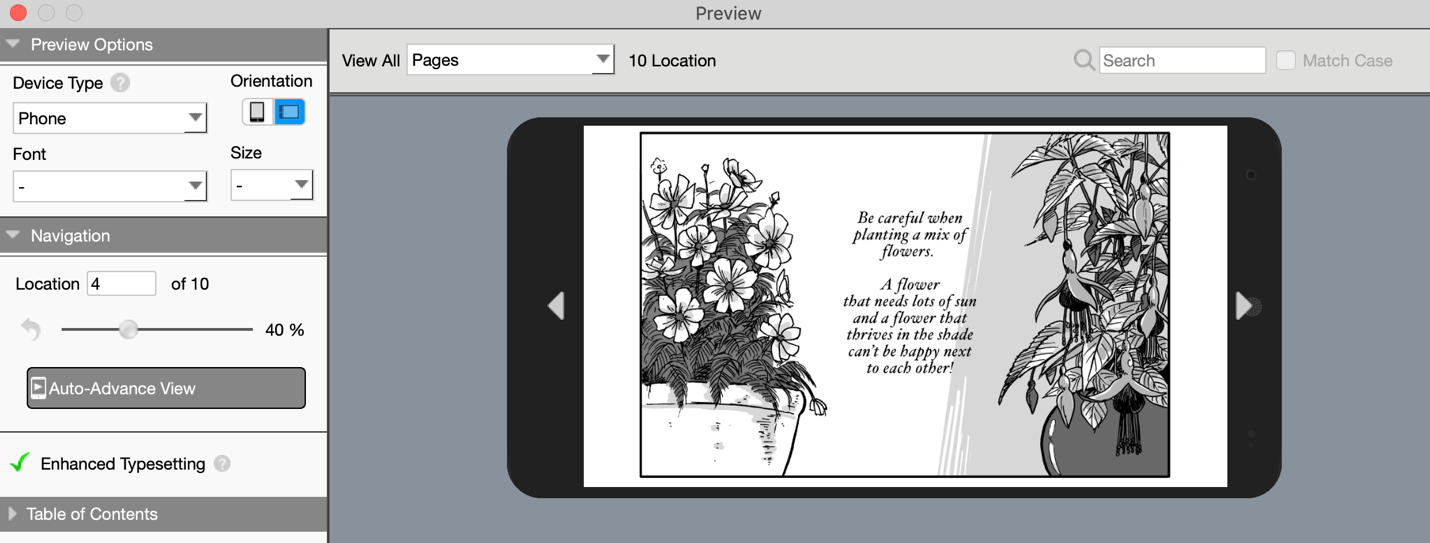
Add a Table of Contents
A table of contents allows readers to jump to a given page in a book.To add a table of contents (TOC):
- Select the page where you’d like to start the table of contents.
- Go to the Page Attributes panel in Kindle Create.
- Check the box labeled Include in Table of Contents.
- Add the title of the section. Titles have a limit of 100 characters.


