


Help Topics
- Help
-
Account & Taxes
- Set up your KDP account
- CreateSpace Account
- Tax Information
-
Book Formatting
-
Format Your Paperback
- Set Trim Size, Bleed, and Margins
- Format Front Matter, Body Matter, and Back Matter
- Save Your Manuscript File
- Paperback and Hardcover Manuscript Templates
- Cover Creator
- Create a Paperback Cover
- Format Images in Your Book
- Paperback Fonts
- Fix Paperback and Hardcover Formatting Issues
- Paperback Submission Guidelines
- Format Your Hardcover
- Format Your eBook
- Tools and Resources
-
Format Your Paperback
-
KDP Publishing
- Start publishing with KDP
-
Create a Book
- Book Detail Resources
- Release Date Options
- Upload Book Resources
- Pricing Resources
- Timelines
- Book Status
- Low-Content Books
- Hardcover
- Beta: Kindle Translate
-
Beta: Audible audiobooks with virtual voice
- Getting started with audiobooks with virtual voice
- Audiobooks with virtual voice eligibility and troubleshooting
- Virtual voice audio samples
- Pricing, royalties, and reports for audiobooks
- Edit audio in the Virtual Voice Studio
- Terms and Conditions for the Beta Version of Audiobooks with Virtual Voice
- Start a Book Series
-
Orders & Book Copies
-
Proof and Author Copies
- How do I order a proof or author copy?
- How much do proof or author copies cost?
- What is the cost to ship my proof or author copy?
- When will my proof or author copy arrive?
- I’m getting an error ordering my author copy
- I’m getting an error ordering my proof copy
- My proof or author copy came damaged
- My proof or author copy didn’t arrive on time
- My proof or author copy has printing errors
-
Proof and Author Copies
- Amazon Store & Detail Page
- Marketing & Distribution
- Book Updates
- Payments & Reports
- Legal & Content Guidelines
-
User Guides
-
Kindle Publishing Guidelines
- Getting Started
- General Best Practices
- Guidelines for Specific Types of eBooks
- Appendices
- KDP Jumpstart
- KDP University
-
Kindle Publishing Guidelines
Contact Us
Have feedback? Can't find your answer in our Help pages?
Contact UsCreate a Hardcover Cover
Your cover must be a single PDF that includes the back cover, spine, and front cover as one image. Cover Creator can also help you design a basic cover that meets our specifications.
To format a paperback cover, visit Create a Paperback Cover.
Your cover needs to be sized with wrap in order to meet our print specifications.
To format a paperback cover, visit Create a Paperback Cover.
Contents
- Cover elements
- Supported file types and sizes
- Set your cover size
- Format your cover background
- Barcode size and placement
- Pre-publication checklist
- Update an existing cover
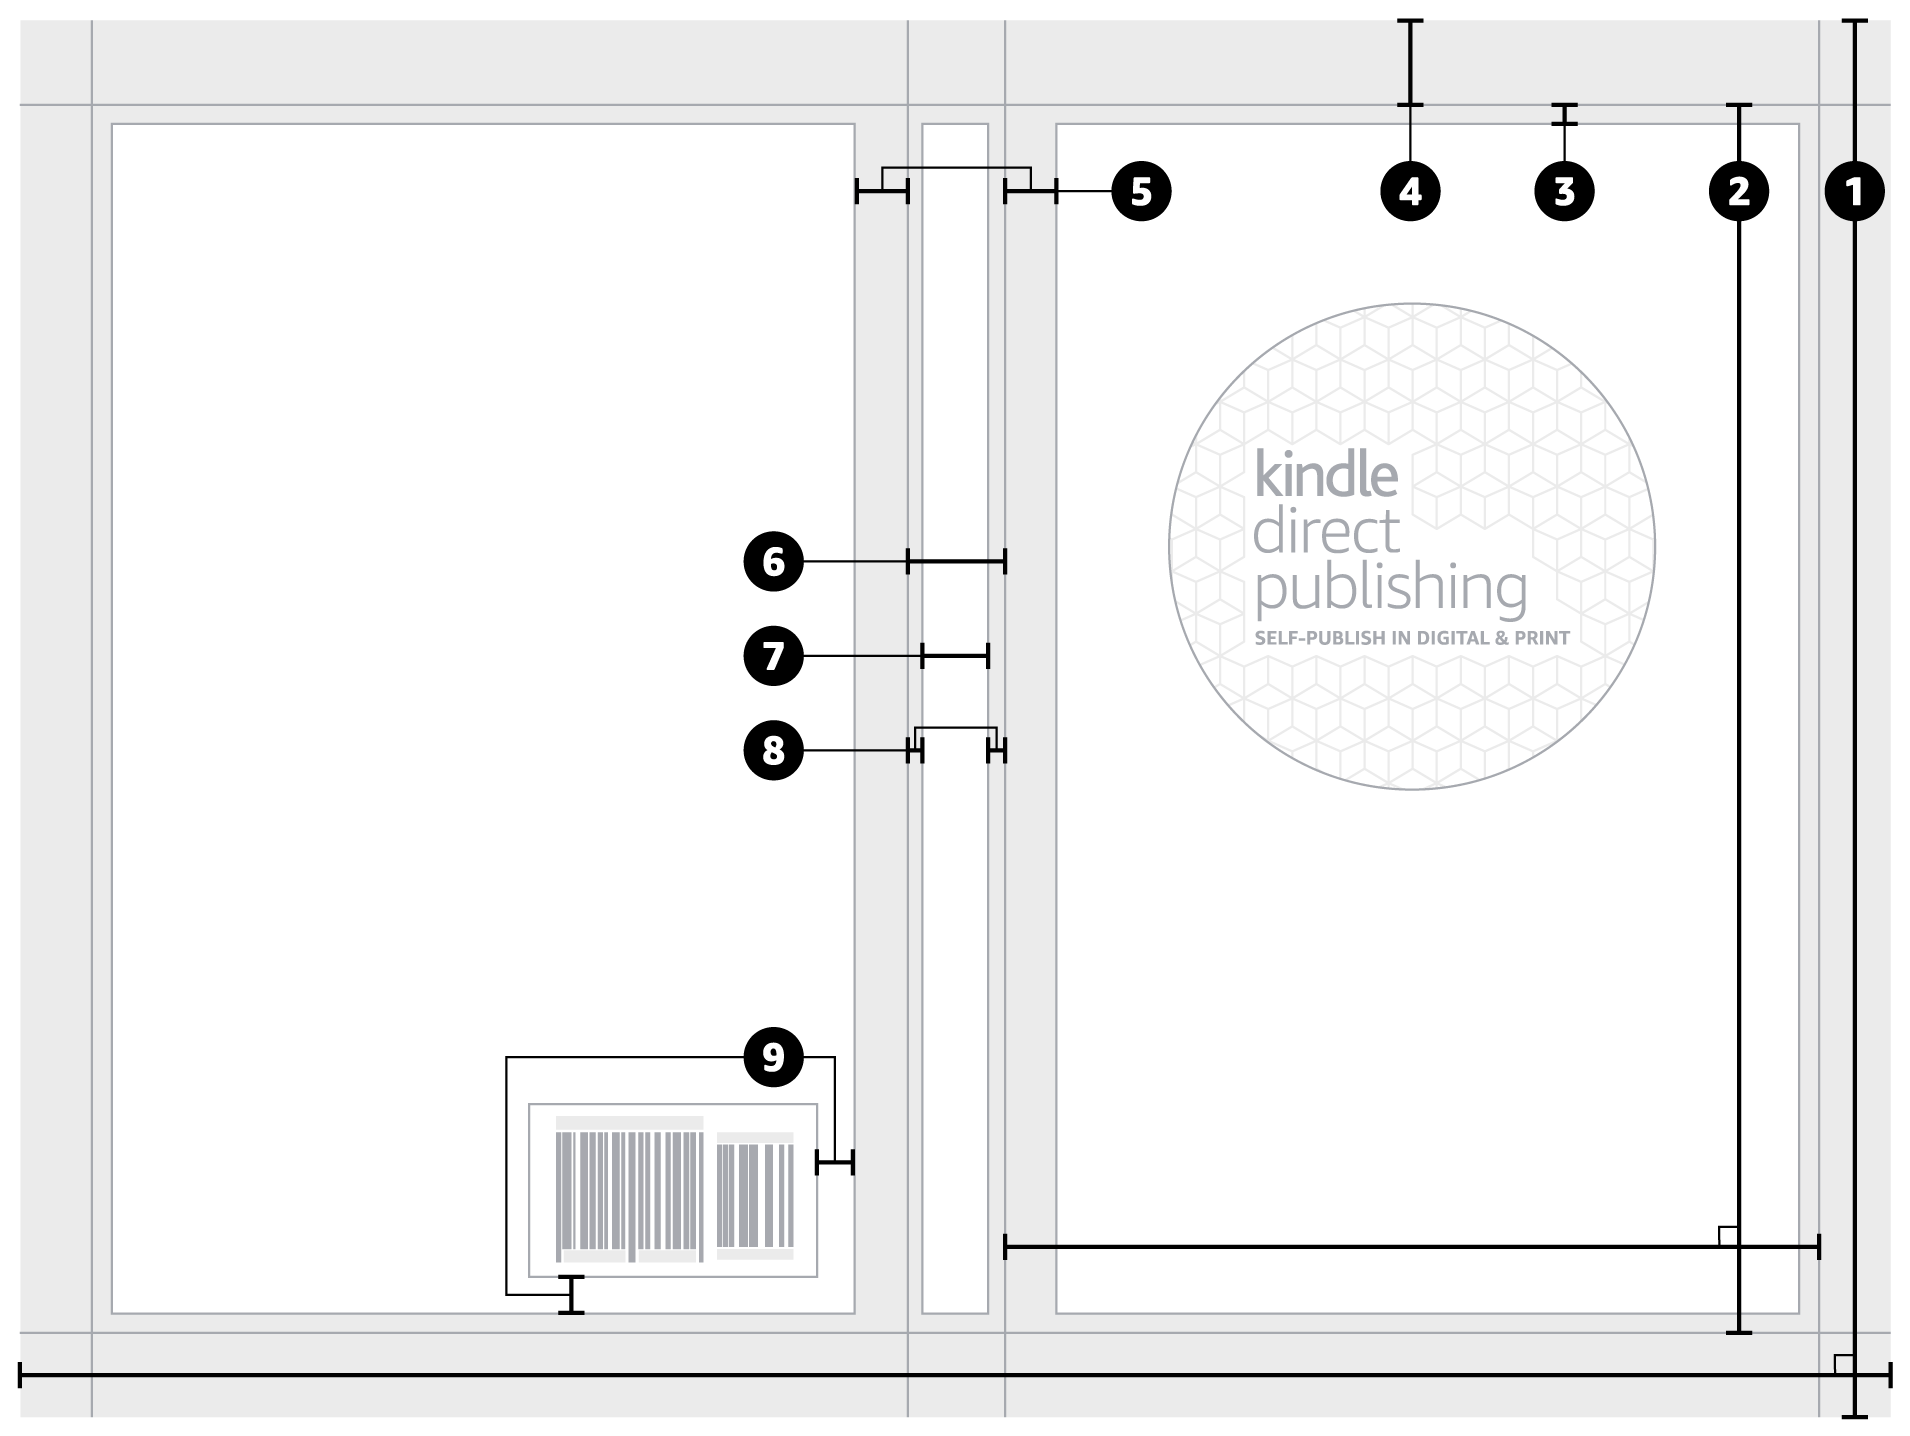
Cover elements
The image below shows the cover file elements of a printed hardcover book. We generate your thumbnail image on the Amazon detail page using the spine edge and top, outside, and bottom book edges as guidelines. This area is illustrated below in guide 2 (front cover).- Cover file. Total width and height of the cover file, including front, back, spine, and wrap.
- Front cover. Width and height of the visible cover area after it's printed. It's the same for the back cover too.
- Margin. Don't place text or images in this area, unless they're intended to wrap to the inside cover.
- Wrap. Portion of the cover file that wraps around the case board and is glued to the inside cover.
- Hinge. When you open the book, the cover bends here.
- Spine. The outside edge of the book where the pages are gathered and bound. A hardcover spine is flat, with a black-and-white headband at the top and bottom of the book if your manuscript is more than 120 pages.
- Spine safe area. Place all spine text and images within this area, so they don't shift to the front or back cover during printing.
- Spine margin. Don't place text or images in this spine area because they could shift to the front or back cover during printing.
- Barcode margin. This area ensures that the barcode doesn't shift during printing and scans properly.
Supported file types and sizes
- File type. Your cover must be a single PDF file that includes the back cover, spine, and front cover as one image.
- File size. We recommend a file size of 40MB or less because large files can slow down printing. Cover files larger than 650MB won't convert.
Set your cover size
To set up your file, try our cover calculator and template generator. After you enter your ink and paper choices, trim size, and page count, the calculator will generate a layout in inches (in) or centimeters (cm).Your cover needs to be sized with wrap in order to meet our print specifications.
Format your cover background
- Wrap. Cover file images should extend 0.51” (15 mm) past the edge of the front cover. This area will wrap around the case board and be glued to the inside cover.
- Text and images. All text and images should be 0.635” (16 mm) from the edge of the book. This is 0.125” (3 mm) inside the margin line.
- Spine hinge. There's a 0.4” (10 mm) space between the spine and safe area on the front and back covers. This flexible spine hinge allows your book to open. Don't include text or the barcode in this area to ensure they aren't distorted.
Barcode size and placement
When you upload your cover, you can choose to provide your own barcode, or we’ll add one for you.- You include your own barcode. It has to have a resolution of 300 dots per inch (DPI). It also needs to be 2" (50.8 mm) wide and 1.2" (30.5 mm) high. When placing the barcode on your back cover, make sure it doesn't obscure other elements. Place your barcode at least 0.76” (19 mm) from the bottom of the cover and at least 0.25” (6 mm) from the spine hinge. If the barcode doesn't meet our specifications, we'll replace it.
- You don't choose to include your own barcode. We'll place an ISBN barcode in a 2" (50.8 mm) by 1.2" (30.5 mm) white box in the lower right-hand corner of your book's back cover. If you leave images or text on this part of the cover, the barcode will cover them during printing, so don't leave anything important there.
Pre-publication checklist
Before you upload your file, make sure you:- Save as a PDF. Your cover must be a single PDF that includes the back cover, spine, and front cover as one image.
- Flatten all transparencies. These can cause the file to print with missing or distorted content. Consult your software's help documentation to learn how.
- Embed your fonts. Consult your software's documentation to learn how.
- Remove crop marks, color bars, template text. Crop marks are lines showing where pages should be trimmed. Color bars are strips with a series of patches used to ensure color balance during printing. Also, remove any template text, PDF creation guides, or software references.
- Ensure your cover image meets the minimum resolution of 300 DPI (dots per inch).
- Optimize PDFs. Optimization is useful to reduce your file size, allowing for higher performance when transferring, uploading, viewing, and printing the files.
- Remove file security. Locked or encrypted files will fail review.
- Check for missing or blank pages. Manuscripts with missing pages, or excessive blank pages will be rejected.
Update an existing cover
To update your cover, follow the instructions below. Please make sure the title, subtitle, and author name match the book details you entered.- Go to your Bookshelf
- Click the ellipsis button ("…") next to the book you want to update and choose Edit hardcover content. This takes you to the Hardcover Content page.
- Scroll to the "Cover" section
- Choose Launch Cover Creator or Upload your cover file to update your cover or upload a cover you already have. Once the content completes the upload process, the message "Cover uploaded successfully" will appear and the conversion process will start. (This can take several minutes depending on the complexity of the file)
- Go to the Book Preview section
- Click Launch Previewer and review your updated cover.
- Click Save and continue. This takes you to the Pricing page.
- Click the Publish button at the bottom of this page.

