


Help Topics
Contact Us
Have feedback? Can't find your answer in our Help pages?
Cover Creator
Our free Cover Creator helps you create and customize your eBook, paperback, or hardcover cover with a variety of layouts and fonts. Cover Creator uses the book details you enter during title setup and adds your book's ISBN to the barcode area on the back cover. Many Cover Creator templates allow you to choose an image from our image gallery or upload your own image.
Cover Creator accepts the following file types:
If Cover Creator doesn't meet your formatting needs, try our do-it-yourself guidelines and templates:
For ideas and tips from other authors, visit the KDP Community.
Note: Cover Creator does not support Japanese, Hebrew, and Yiddish.
Video: Introduction to Cover Creator
Cover Creator is supported in these languages except for the following languages, book type and KDP account.
Cover Creator accepts the following file types:
- JPG
- PNG
- TIF/TIFF
If Cover Creator doesn't meet your formatting needs, try our do-it-yourself guidelines and templates:
- Create an eBook Cover
- Create a Paperback Cover
- Hardcover Cover Formatting
- Paperback and hardcover cover templates
For ideas and tips from other authors, visit the KDP Community.
Note: Cover Creator does not support Japanese, Hebrew, and Yiddish.
Contents
- Supported languages by book format
- Before you launch Cover Creator
- How to use Cover Creator to create your paperback cover
- Launch Cover Creator
- Get images for your cover
- Pick a template, and then pick a design layout
- Replace the placeholder text on the back cover (title description and author bio)
- Format text on your spine and front cover
- Upload author photo
- Preview your cover in Cover Creator
- How to use Cover Creator to submit a fully formatted JPEG paperback cover
- Troubleshooting:
Video: Introduction to Cover Creator
Supported languages by book format
Cover Creator is supported in these languages except for the following languages, book type and KDP account.
|
Book format |
Kdp.amazon.com |
Kdp.amazon.co.jp |
|
eBook |
Japanese, Polish, and Ukrainian is not supported. |
Cover Creator is not supported. |
|
Paperback |
Japanese, Hebrew, and Yiddish are not supported. |
Japanese, Hebrew, and Yiddish are not supported. |
|
Hardcover |
Hebrew and Yiddish are not supported. |
Hardcover is not supported. |
Before you launch Cover Creator
Note: Cover Creator is only supported in the following browser versions: Chrome 70+, Edge 79+, Firefox 63+, Safari 14+. Make sure you have the latest version of your browser installed.
To provide the best customer experience, please follow our Metadata Guidelines.
Placeholder text
When creating a new cover file in Cover Creator there are two text fields on the back cover (Title description and author bio). These fields are filled with placeholder text to allow you to see how the text flows in the template before selecting it. When you click this text, the text disappears and a large blinking cursor appears. If you click outside of this text box at this point, the placeholder text will not reappear. You will need to click in the location of the text box to reactivate it and then paste or type your text. If you don’t see a cursor after clicking the location of the text box, just type or paste and your text will appear. If you're unable to edit text, you may need to try another browser. We recommend using Chrome or Firefox.
Lines and spacing
When editing text in the description and author bio section you might decide to set the line length, ensuring each line fits in our desired format. If this is the case you will need to set the font to a specific size and then enter a soft return at the end of each line. To do this, hold the shift key when entering a return. This will take the text to the next line without adding empty characters at the end of each sentence.
Tip: Hard return versus soft return
Back-cover images
Shifting spine text
Cover Creator was designed to create a cover that is sized correctly for your interior. This is done by calculating the size of your cover from: the paper type (white/cream) chosen, how it is printed (color/black and white), and how many pages are in the interior. If Cover Creator is launched before the interior file has processed, the correct calculation cannot be made. This results in text boxes shifting in the preview section of Cover Creator. If this should occur please move into the Print Previewer. If this error still shows in Print Previewer, please contact us.
Note: The triangles look the same regardless of whether they are a warning or a blocker.
Warnings: You can proceed with the following warnings
A. The outer edge is the edge of your cover file
B. The white dotted line represents the trim line. This is where your publication will be cut to size. In the spine area, the white dotted line represents the edge of the spine.
C. The red dotted red line is the margin. All text will need to remain within this line.
Enter paperback or hardcover details
Make sure you have entered the title, subtitle, author name, and series information on the Paperback Details or Hardcover Details tab. Cover Creator will use these details to generate your cover.To provide the best customer experience, please follow our Metadata Guidelines.
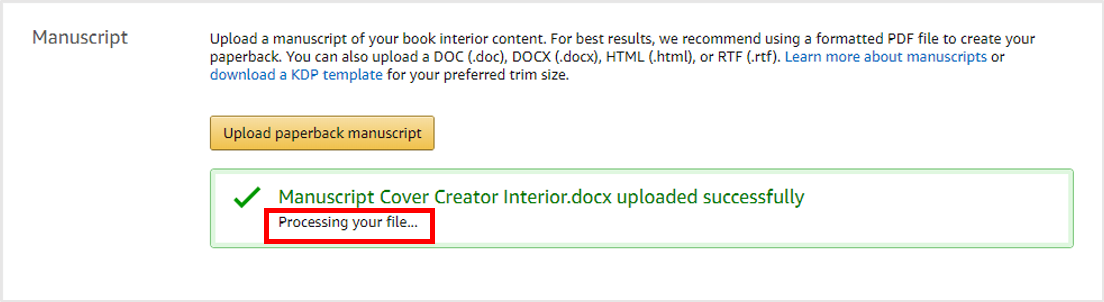
Upload interior manuscript and wait for it to process
The spine width of your cover depends on the page count of your interior file, so make sure you have uploaded your interior file, and it has finished processing, before you launch Cover Creator. If you launch Cover Creator before your interior file is processed, the default setting for Cover Creator won’t match your interior file. This can result in issues with your spine width and text. To avoid this issue, wait until the message “Processing your file…” is gone before launching Cover Creator.
How to use Cover Creator to create your paperback cover
Launch Cover CreatorNote: we recommend using Firefox or Chrome for the best experience using Cover Creator. To use the tool, you need to have created a title on your Bookshelf. If you've created a title, follow the steps below to launch Cover Creator.
Note: If you have trouble launching Cover Creator, try clearing the cache in your web browser. For instructions on clearing your cache, please consult your browser's help documentation. You can also try a forced reload. To force reload, hold down the Shift key and click the Reload or Refresh button in your browser. If you need to start over at any point in the process, click the Start Over button on the bottom left of Cover Creator. |

Get images for your coverYou can choose an image from our image gallery or from your computer. When uploading your own images to Cover Creator, make sure:
Visit Format Images in Your Book for more information on meeting the minimum resolution of 300 DPI. How to edit or change your cover image If you want to edit your cover image or choose a new cover image, click anywhere on the cover, except where other elements (e.g., text boxes) exist. A dialog box titled Edit cover image will appear on the right with options to choose a new image or change the current image's size, position, and rotation. Please ensure any images intended to bleed extend all the way to the edges. Learn more about bleed. |
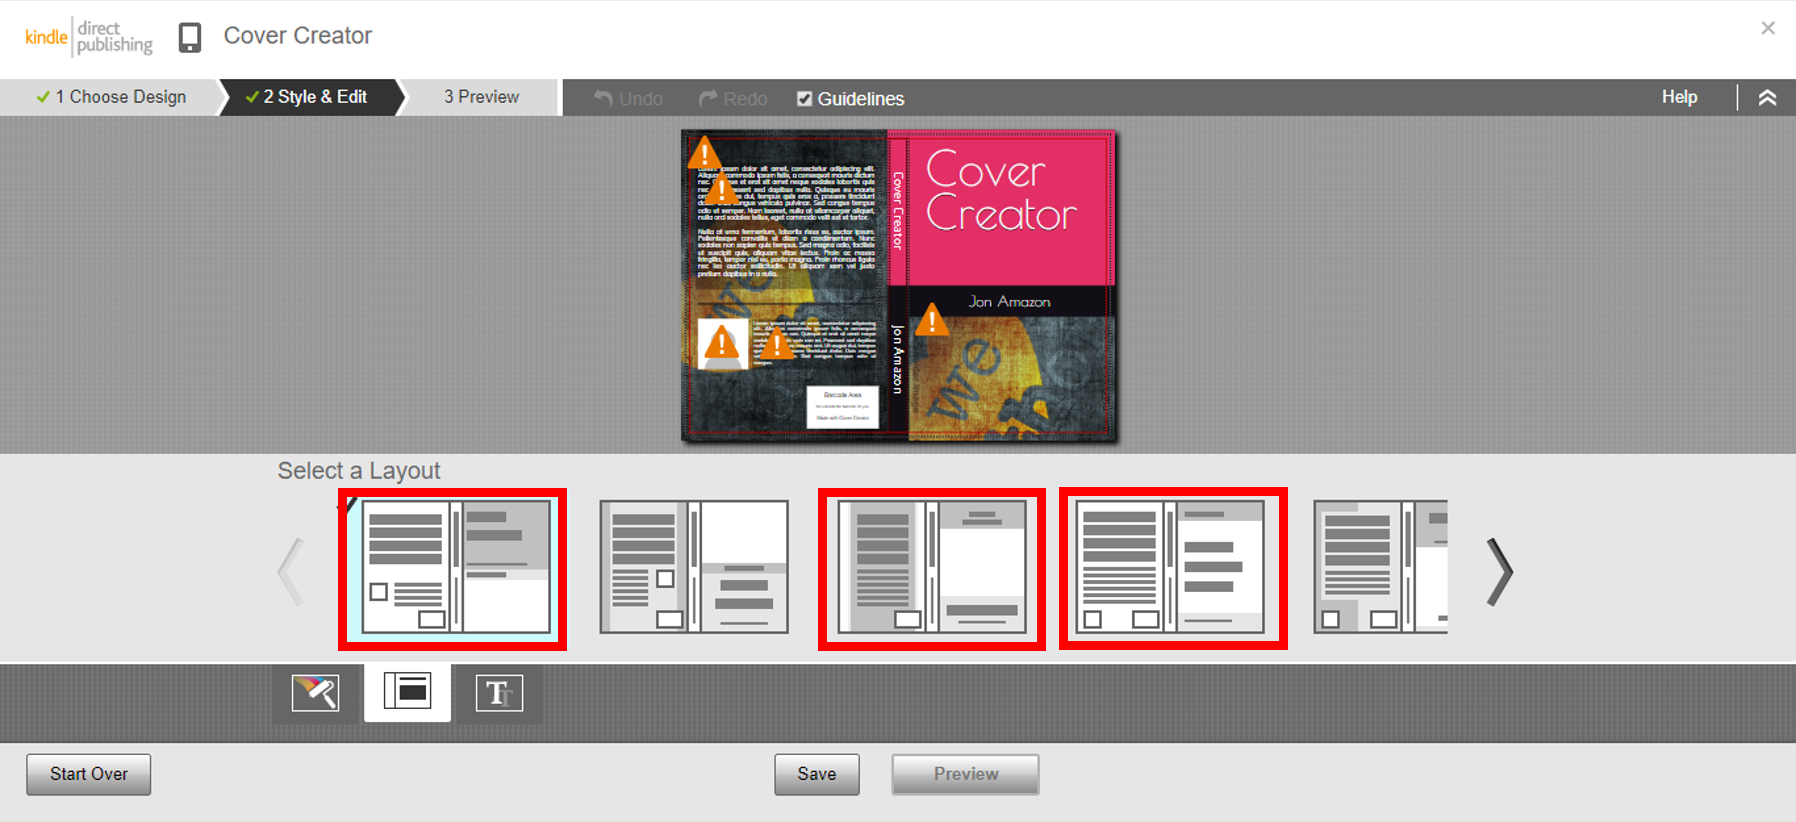
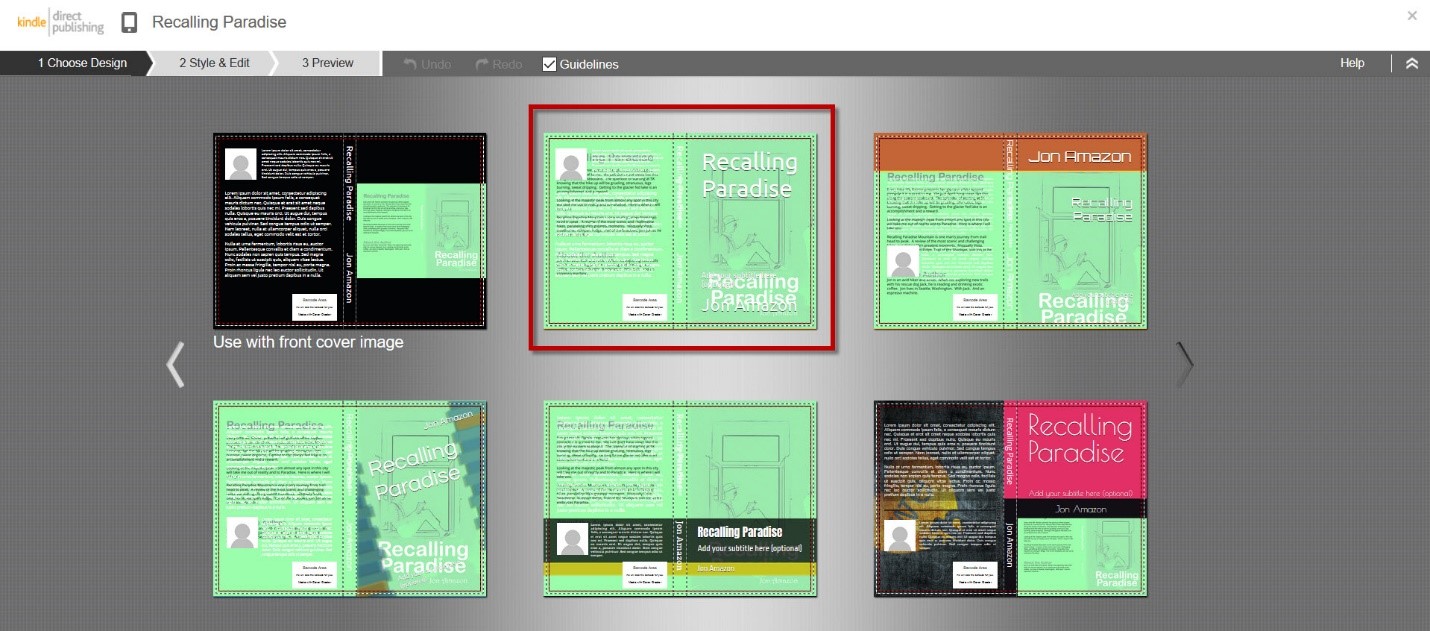
Pick a template, and then pick a design layoutCover creator lets you choose a template that broadly matches your needs and then refine your choice by selecting a layout within that template.


|
Replace the placeholder text on the back cover (title description and author bio)


Note: If you decide you don’t want a particular text box, simply delete the text and then it won’t appear on your book cover. You only need to delete the text, not the text box. |
Format text on your spine and front coverThe title and author name on the front cover and spine will auto-populate based on what you entered in your book details, but you can change the style. By default the text will be set to autofit with a drop shadow. To format your text:
Note: The minimum page count required to include text on the spine is 80 pages. The minimum font size for covers is 7pt. For books between 80–130 pages, the autofit feature in Cover Creator may render your font size smaller than 7pt. If the font size rendered using autofit is smaller than 7pt, the spine text is removed from your cover. 
|
Upload author photoTo upload your author photo:
Note: If you’d prefer not to have an author photo, no photo is needed in order to proceed forward. Simply leave the placeholder image where it is. The warning triangle that appears will not block you from proceeding. |
Preview your cover in Cover CreatorAt the bottom of the page, click the Save button followed by the Preview button. Make sure that your cover looks how you would like it to look, and then click Save and submit. If you want to make more changes to your cover, click Style & Edit in the top left corner to go back and continue editing. |
How to use Cover Creator to submit a fully formatted JPEG cover
To upload your fully formatted JPEG paperback cover file:- Go to your Bookshelf.
- Click the ellipsis button (…) under the Paperback or Hardcover Actions menu and then click Edit Paperback Content or Edit Hardcover Content.
- Scroll down to Book Cover and click Launch Cover Creator.
- On the Get images for your cover window, select From My Computer and upload your JPEG cover file and click Next.
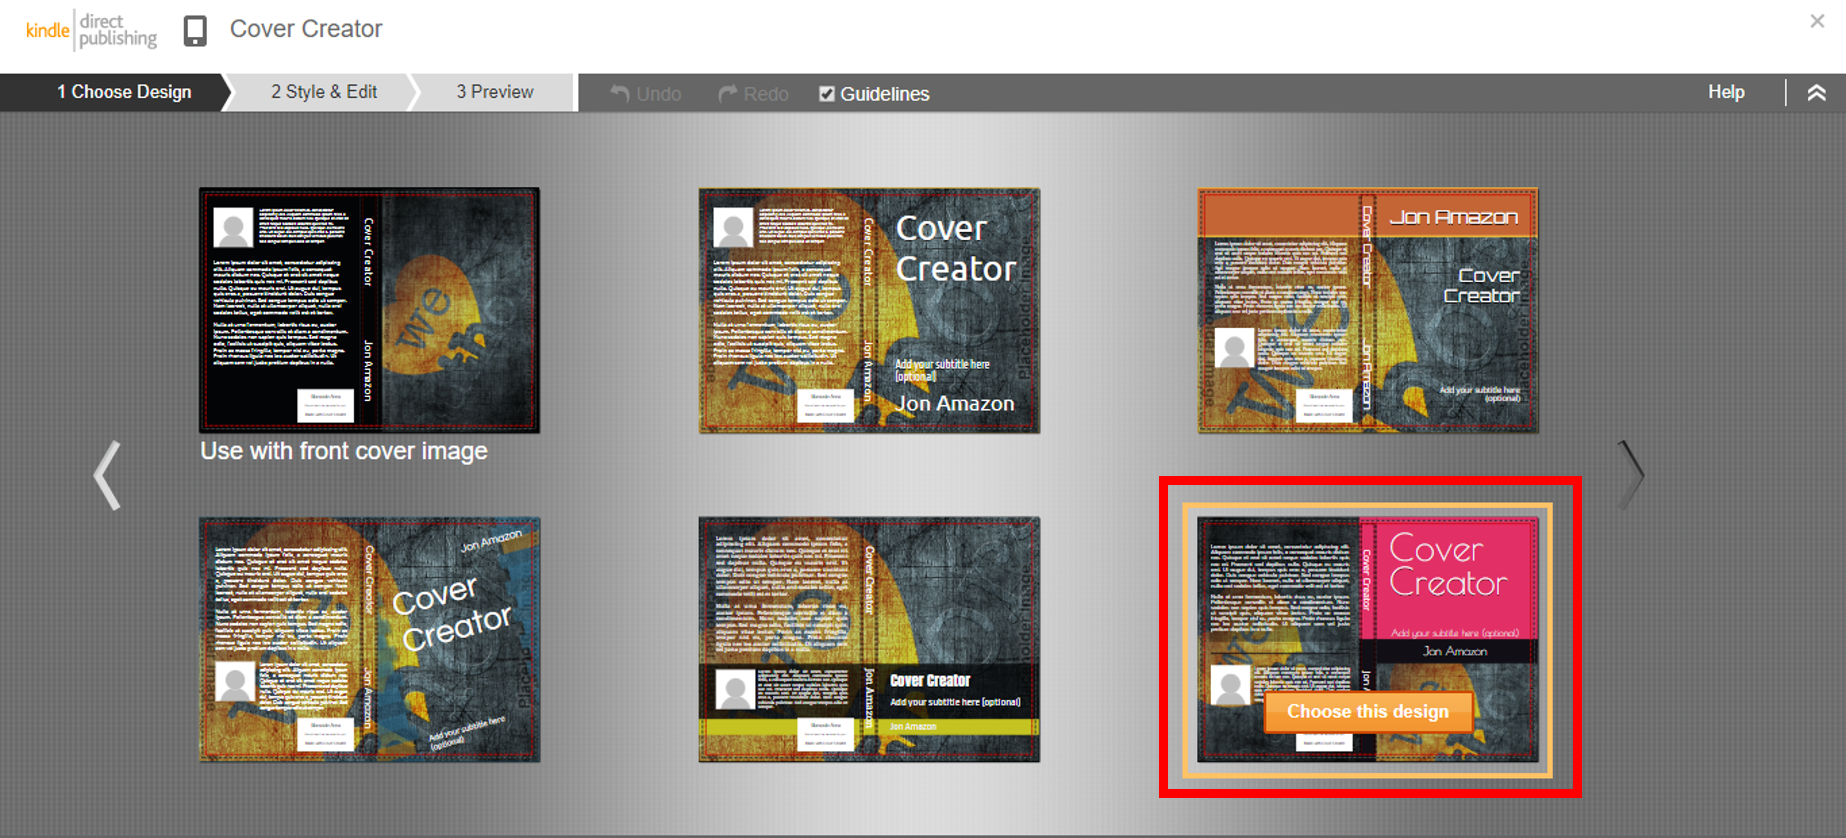
- Choose the second design from the left on the top row. This design accommodates a full wrap image. It also includes filler text, which you will remove next.
- Click Choose this Design to customize your cover.
Note: All covers have bleed. Please ensure all images intended to reach all the way to the edges when produced extend past the edge of the trim line by 0.125” (3.2 mm). Learn more about bleed. - Click each text box and the placeholder text will disappear.
Note: The author photo placeholder will disappear if you don't upload an image. - Click Preview to proof your work. The empty text box fields will not be visible on the final cover file.
- Click Save and Submit.


Troubleshooting
Back cover text and images
Placeholder text
When creating a new cover file in Cover Creator there are two text fields on the back cover (Title description and author bio). These fields are filled with placeholder text to allow you to see how the text flows in the template before selecting it. When you click this text, the text disappears and a large blinking cursor appears. If you click outside of this text box at this point, the placeholder text will not reappear. You will need to click in the location of the text box to reactivate it and then paste or type your text. If you don’t see a cursor after clicking the location of the text box, just type or paste and your text will appear. If you're unable to edit text, you may need to try another browser. We recommend using Chrome or Firefox.
Lines and spacing
When editing text in the description and author bio section you might decide to set the line length, ensuring each line fits in our desired format. If this is the case you will need to set the font to a specific size and then enter a soft return at the end of each line. To do this, hold the shift key when entering a return. This will take the text to the next line without adding empty characters at the end of each sentence.
Tip: Hard return versus soft return
- Hard return: When a paragraph ends and a new one begins, you use the Enter key. This will place the next sentence down with slightly more space in between lines to indicate a new paragraph.
- Soft return: When you want the line to break at a particular point but not create a new paragraph, hold down the Shift key down while you press Enter. This breaks a sentence across two lines without the additional spacing of a new paragraph.
Back-cover images
- Author photo: Please see the Upload author photo section above.
- Back-cover featured image: We have one template that allows for a separate back-cover featured image in addition to the author photo. The template and layout options to do this are labeled in the screenshots below.
Front cover and spine text
Shifting spine text
Cover Creator was designed to create a cover that is sized correctly for your interior. This is done by calculating the size of your cover from: the paper type (white/cream) chosen, how it is printed (color/black and white), and how many pages are in the interior. If Cover Creator is launched before the interior file has processed, the correct calculation cannot be made. This results in text boxes shifting in the preview section of Cover Creator. If this should occur please move into the Print Previewer. If this error still shows in Print Previewer, please contact us.
Warning triangles
When creating your cover in Cover Creator the tool has a way of checking the elements you upload to ensure the best quality possible can be produced. Some of these triangles are warnings that will prevent you from submitting your cover (blockers) and others won’t (warnings).Note: The triangles look the same regardless of whether they are a warning or a blocker.
Warnings: You can proceed with the following warnings
- Low DPI (any image under 300 DPI)
- Replace placeholder image for author photo
- Replace placeholder text: must either be deleted or replaced
- Replace primary cover placeholder image: either select an image from the gallery or upload your own image
- Choose a smaller size font: text must fit in the available text box
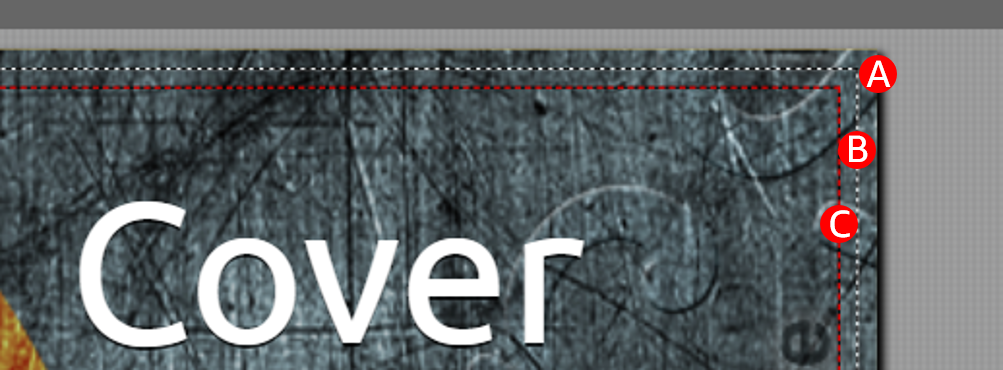
Dotted lines in Cover Creator
A. The outer edge is the edge of your cover file
B. The white dotted line represents the trim line. This is where your publication will be cut to size. In the spine area, the white dotted line represents the edge of the spine.
C. The red dotted red line is the margin. All text will need to remain within this line.

