English | Help | Sign in | Give Feedback

How would you rate your experience using this page?

Visit our help center for resources to common issues

Click here to take our survey and give us detailed feedback.

Thank you for your feedback.

Click here to take our survey and give us detailed feedback.

Help Topics

Contact Us

Have feedback? Can't find your answer in our Help pages?

Contact Us

Build Your Book – Format a Paperback Manuscript (Pages for Mac)

In this step-by-step guide, we show you how to format a paperback manuscript in Pages (Version 7.3) for Mac.

Pages for iCloud may have reduced features. For more information about the differences, visit Pages Support.

See our separate guides for formatting a paperback in Microsoft Word for Mac and Microsoft Word for Windows. Alternatively, you can try our Kindle Create tool to format your paperback interiors.
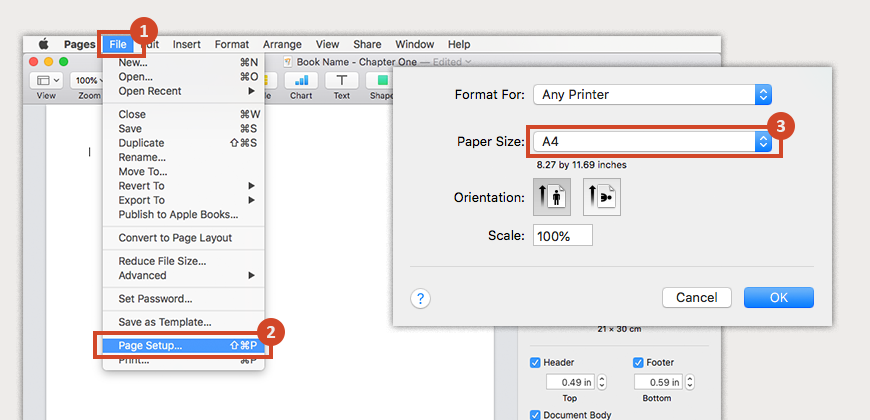


Step 1

Set page size and margins

For books without bleed

  1. In the main menu, click File and Page Setup... This opens a dialog box. Click Paper Size and choose Manage Custom Sizes... at the bottom of the list.

    Go to File, click Page Setup, and click Paper Size

    Select Manage Custom Sizes from the Paper Size menu

  2. Click the + button to create a size. Name the size and enter your book’s trim size into the Width and Height fields. Set the margins to 0 in.

    Create a custom paper size

  3. In the Document sidebar, click the Document tab at the top.

  4. Under Printer & Paper Size, make sure that your custom size is selected. If not, click the drop-down menu and find your size at the bottom.

  5. Choose a Page Orientation (portrait or landscape). You can use only one page orientation for your document. Pages doesn’t support a mix of pages in portrait and landscape in the same document.

    Make sure that your custom paper size is selected, and choose a page orientation

  6. In the same panel, go to the Document Margins section and choose Facing Pages.

  7. Use the margin size chart to identify your margin sizes based on page count.

  8. Enter your Top, Bottom, Inside, and Outside margins based on your book's page count. (We used 0.38 in for our Outside margin for a professional look.) Set the Top and Bottom to 1 in.

    Choose the Facing Pages option and enter the document margins
Tip: If your page count changes, go back and check the inside margin because it may also need to change.


For books with bleed

  1. In the main menu, click File and Page Setup... This opens a dialog box. Click Paper Size and choose Manage Custom Sizes... at the bottom of the list.

    Go to File, click Page Setup, click Paper Size, and choose Manage Custom Sizes

  2. Click the + button to create a size. Name the size and enter your book’s trim size into the Width and Height fields (with bleed added). Add 0.125 in (3.2 mm) to the width and 0.25 in (6.4 mm) to the height. For example, if your trim size is 6 x 9 in (15.24 x 22.86 cm), set the page size to 6.125 x 9.25 in (15.54 x 23.46 cm). Pages might round 0.125 in to 0.13 in. This is fine. Set the margins to 0 in.

    Create a custom paper size that accounts for bleed

  3. In the Document sidebar, click the Document tab at the top.

  4. Under Printer & Paper Size, make sure that your custom size is selected. If not, click the drop-down menu and find your size at the bottom.

  5. Choose a Page Orientation (portrait or landscape). You can use only one page orientation for your document. Pages doesn’t support a mix of pages in portrait and landscape in the same document.

    Make sure that your custom paper size is selected, and choose a page orientation

  6. In the same panel, go to the Document Margins section and choose Facing Pages.

  7. Use the margin size chart to identify your margin sizes based on page count.

  8. Enter your Top, Bottom, Inside, and Outside margins based on your book's page count. Set Outside to at least 0.375 in (9.6 mm) and Top and Bottom to 1.25 in (3.2 mm) to accommodate for the bleed.


Margin size chart

Use this chart to find your margin size:
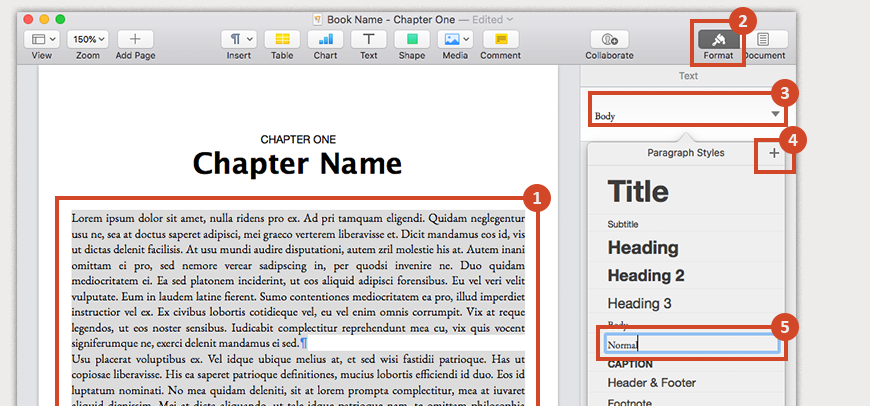
Page count Inside (gutter) margins Outside margins (no bleed) Outside margins (with bleed)
24 to 150 pages 0.375 in (9.6 mm) at least 0.25 in (6.4 mm) at least 0.375 in (9.6 mm)
151 to 300 pages 0.5 in (12.7 mm) at least 0.25 in (6.4 mm) at least 0.375 in (9.6 mm)
301 to 500 pages 0.625 in (15.9 mm) at least 0.25 in (6.4 mm) at least 0.375 in (9.6 mm)
501 to 700 pages 0.75 in (19.1 mm) at least 0.25 in (6.4 mm) at least 0.375 in (9.6 mm)
701 to 828 pages 0.875 in (22.3 mm) at least 0.25 in (6.4 mm) at least 0.375 in (9.6 mm)


Step 2

Modify styles for a custom look

Add a normal style

To select all body text to be formatted, place the cursor before the first chapter title and hold down the SHIFT + cmd + down arrow keys until the cursor moves to the end of your document.

Select all body text in your document

  1. With the body text selected, in the Format sidebar, select the style and click the + button to create a style. Call it Normal.

    Create a style called Normal

  2. Select your Font and Font Size from the options. For example, set Font Size to 10 and select the Garamond font.

  3. Under Alignment, select Justify text.

  4. Under Spacing, set the Before Paragraph and After Paragraph to 0 with Spacing select Lines 1.25.

  5. Click the Layout tab. Under Indents, enter 0.2 in in the First field.

  6. Click Update in the style preview area to set these settings as the format for all body text.

    Choose the font, alignment, and spacing for your body text


Set the Heading 1 style

  1. Highlight the chapter 1 title.
  2. In the Format sidebar, select the style Heading.
  3. Select your Font, Font Size, and Color, and set the Alignment to Center. For example, select black, Lucida Grande, Bold, 24 pt, Centered.
  4. Under Spacing, set Before Paragraph and After Paragraph to 60 pt to move the title about a third of the way down the page and separate it from the first paragraph.
  5. Click Update in the styles window.

    Choose the font, alignment, and spacing for the heading 1 style


Step 3

Format chapters (section breaks and chapter titles)

Why this step matters:

  • Section breaks. To ensure that your content begins on the correct page, use section breaks. Section breaks allow you to change the formatting of a specific section without affecting other sections. Add a section break between the front matter and book body to distinguish these parts of the book. Also, use section breaks so each chapter title page starts on its own page.
  • Chapter titles. When you format each chapter title page, apply the Heading 1 style to each chapter title. In addition to the consistent look that Heading 1 provides throughout your book, using Heading 1 tags the chapter title so that it will appear in the table of contents, which is explained in Step 9.


Add section breaks

  1. Place the cursor at the end of the front matter.
  2. Either in the toolbar or main menu, click Insert and Section Break
  3. Repeat the previous step at the end of each chapter.

    Insert a section break


Format chapter title pages

  1. Highlight the title of the first chapter.
  2. Under Format, within the Styles area, click the drop-down arrow and create a style by clicking the + icon. Call this style Chapter title.
  3. Select your Font, Font Size, Color, alignment, and so on, and click Update when finished.
  4. Repeat the previous steps for each chapter title.

    Create a style for chapter titles


Step 4

Format front matter

Front matter are the sections that come before the first chapter. Some elements are expected and others are optional, but there is a standard order. Learn more about front matter elements.

Tip: Right-facing pages are odd numbered pages in printed books because the first piece of paper is on the right side, facing up from the open, printed book. The back of the cover is the left-facing page.


Add section breaks and blank pages

Use section breaks to add blank pages within the front matter as needed to ensure that pages have the proper position. To insert a blank page with a section break:

  1. Place the cursor at the top of the page that will follow the new blank page.
  2. Either in the toolbar or main menu, click Insert and Section Break.
  3. To create a placeholder page for the table of contents, add a right-facing blank page immediately before Chapter 1 and name it Table of Contents.
  4. Before you start applying styles, make sure that you've added section breaks in between pages of your front matter as described in Step 3.


Format front matter pages

Half title page

  1. Highlight the title text. In the Style tab, change the alignment to Center.
  2. In the Font group, select your Font, Font Size, and Color. For example, select black, Lucida Grande, 32 pt, centered.
  3. Under Spacing, set Before Paragraph to 32 pt and After Paragraph to 16 pt to move the chapter title about a third of the way down the page and separate it from the first paragraph.

    Format the title on a half title page


Title page

  1. To format the title, repeat the steps in the Half title page section with the same choices of font, size, color, alignment, and spacing.

  2. To format the subtitle:
    • Choose the same Font as your title and then select Italicized, a smaller Font Size (example: 24 pt), and Center alignment.
    • Under Spacing, set Before Paragraph and After Paragraph to 16 pt.
  3. To format the author name:
    • Choose the same Font as your subtitle, a smaller Font Size (example: 16 pt), and Center alignment.
    • Under Spacing, set Before Paragraph to 16 pt and After Paragraph to 0 pt.

      Format the title, subtitle, and author name on a title page


Copyright page

To format the copyright page, highlight all the copyright content. With Format selected, under Alignment, select Center. If you don't have a copyright page, you can use a template like this:

Copyright © 2018 Author Name
All rights reserved.
ISBN-13:

Tip: To make the copyright symbol, hold down the ALT + G keys. If you choose a KDP ISBN, it is your ISBN-13. If you have a 10-digit ISBN, change "ISBN-13" to "ISBN".


Dedication

  1. To format the dedication, apply Heading 1 to the dedication title.
  2. Select all of the dedication content. Under Alignment, select Center.


Table of contents (TOC)

You'll add and format the table of contents in Step 9.


Preface, acknowledgments, and prologue pages

  1. Apply Heading 1 to the titles of these pages.
  2. Apply the Normal style to the content of these pages.
In Step 2, you modified Heading 1 for all chapter titles. Using the Heading 1 style also pulls anything tagged Heading 1 into the table of contents (Step 9). Use Heading 1 for any front matter pages that you want in your table of contents.


Step 5

Add pagination

Some books have different pagination styles between the front matter (Roman numerals) and book body (Arabic numerals). If you're unsure whether to use different pagination styles (it's not typical for novels), find books with content similar to yours to get an idea of what readers expect. To achieve different pagination styles, you have to use section breaks (see Step 3).

  1. Click in a page where you want to add headers and footers.

  2. Move the pointer over the top or bottom of the page until you see the three header or footer fields, then click one. You can use any combination of fields to complete your header or footer.

    Tip: If you don’t see the fields, turn on headers and footers for the document (click the Document button in the toolbar, click the Document tab at the top of the sidebar, then select the Header and Footer checkboxes).

  3. Click the Insert Page Number pop-up menu and choose the numbering style at the top of the list.

    Insert a page number

  4. To set the distance from the top and bottom page margins, view the Document settings and click the arrows or enter values in the fields next to Top and Bottom (below the Header and Footer checkboxes in the sidebar).

    Change how far the page number is from the top and bottom margins

  5. Click the Section tab at the top of the sidebar, then choose any of the following:
    • Hide on first page of section: Hide the header or footer on the first page. If the document has more than one section, it applies only to the first page of this section.
    • Match previous section: Use the same headers and footers from one section to the next. Clear this checkbox if you want to use different headers and footers for this section.
    • Update the Page Numbering Format to either be regular numbers or Roman numerals.
    • Left and right pages are different: When this checkbox is selected in a document using facing pages, the headers and footers on left and right pages can be different. To set up facing pages, see Step 1.

      Choose options for the header and footer, such as whether to hide them on the first page of the section

  6. To change the font, font size, color, and alignment of header and footer text, select the text, then use the controls in the Format sidebar.

    Change the font and alignment of the header and footer text


Unlink footers between front matter and book body

  1. Select the page number within the footer of the front matter, before the book body.
  2. In the Section tab, clear the checkbox labeled Hide on first page of section under Headers & Footers.
Tip: Removing page numbers from certain front matter pages is done using the same process.


Fix page numbering issues

You may notice that the pagination restarts at 1 at the beginning of a chapter or section.

To fix this, highlight the page number on the pages that restart at 1 and select the checkbox labeled Match previous section under Headers & Footers.

Make the header and footer match the previous section


Step 6

Add headers (advanced)

Alternating headers between the book title and author name is common in book design. To achieve different headers for the book content and front matter, you have to set up your file using section breaks (see Step 3).

Make your headers alternate so that the left and right pages are different

Add headers

  1. Click in a page where you want to add a header.
  2. Move the cursor over the top of the page until you see the three header or footer fields. Then click one. You can use any combination of fields to complete your header or footer.
    Tip: If you don’t see the fields, turn on headers and footers for the document (click the Document button in the toolbar, click the Document tab at the top of the sidebar, then select the Header and Footer checkboxes).
  3. Input your header text and format the text under the style section.


Remove headers and footers from chapter title pages

It's common for chapter title pages not to include headers. Here's how to remove them:

  1. Select the chapter title page from which you would like to remove the header.
  2. Under the Section tab, click the Create new section drop-down and choose Starting with this page.
  3. On the next body text page, update the header once again either with a new heading or the same as previous to continue it from this point.
Tip: It may be more efficient to do the tasks for each chapter title page (apply Heading 1, first paragraph, drop cap, and remove headers and footers) before moving to the next chapter title page. This is covered in Step 7.


Step 7

Format chapter title pages (advanced)

A drop cap is a large capital letter typical for the first letter of the first word in a chapter. A drop cap gives your chapter title page a professional look.

  1. Go to the chapter title page on which you would like to add a drop cap. Click the Text button or Insert then Text Box.

  2. Type in the letter you would like to have as your drop cap. Our example uses "L".

  3. Roughly position the text box at the beginning of the paragraph. Make sure that Text Wrap is set to Automatic and Text Fit is Wrap text around the object’s rectangular boundary. Set the Spacing to 0 pt.

    Add a drop cap to the first word in a chapter

  4. Update your text box’s format to match the rest of the paragraph, but increase the font size so that it becomes as tall as three lines of text.

  5. Continue increasing and decreasing the size of the text box until there is adequate spacing created by the text wrap and the font size is correct.

    Adjust the text box and font size for the drop cap

  6. Copy and paste the text box onto any other new paragraph that requires a drop cap to keep the same formatting.


Step 8

Add images (advanced)

This step shows you how to insert images for books with and without bleed. It also shows you how to position and styles images. Before you insert images, make sure they are high resolution.


Insert images for books without bleed

  1. Go to the area where you would like to add an image. Click Media and select Choose... to choose your image.

  2. Under the Format tab, select Arrange and make sure that the Constrain proportions checkbox is selected. Adjust the Height or Width as desired either by the number fields or using the toggles on the edges of the image.

  3. Set the image positioning to have text wrap around it. This allows you to reposition the image on the page. Select Automatic under the Text Wrap section in Arrange.

  4. Make sure that the image is inside all four margins. You can turn on gridlines to show where your margins begin by going to the View tab and clicking Show Layout. You can manually resize and position the image so that it snaps to these areas for ease. If the image is sized so that it is close to the margins, do the math. Subtract your inside and outside margins from the trim size for width and subtract top and bottom from the trim size for height. The image size cannot be larger than:
    • Image Size Width (No Bleed) = Trim Size – Inside Margin – Outside Margin
    • Image Size Height (No Bleed) = Trim Size – Top Margin – Bottom Margin

      Add an image to your book

      Use Show Layout to turn on gridlines and ensure that your image is inside the margins


Insert images for books with bleed

  1. To size an image for bleed, under the Format tab, select Arrange and make sure that the Constrain proportions checkbox is selected. Then adjust the Height or Width as needed to make the image bleed to the edge of the page.

  2. Set the image positioning to have text wrap around it. This allows you to reposition the image on the page. Select Automatic under the Text Wrap section in Arrange.

  3. To have the image bleed from side to side, set the width of your image to the width of your trim size plus 0.125 in (3.2 mm). For our example book, we sized our image width to 6.125 in (15.54 cm).

  4. If you want your image to bleed from top to bottom, set the height of your image to 0.25 in (6.4 mm) plus the book's trim size height. For a 6 x 9 in (15.24 x 22.86 cm) book, set the height to 9.25 in (23.46 cm).

    Adjust an image for bleed

  5. Before you upload your interior file to KDP, make sure that you choose Bleed in the KDP paperback options, on the Paperback Content tab, in the Print Options section.


Apply a style to an image

  1. Click the image to open the tab bar. Select Style.
  2. Either choose from existing presets or create your own style using Borders, Shadow, Reflection, and Opacity.
  3. If you would like to keep a particular style, save it by clicking the + icon in the presets.


Step 9

Create a table of contents (TOC)

Not all paperbacks have a TOC. If you're unsure whether to include one, find books with content similar to yours to get an idea of what readers expect. If you also want to publish your book in digital format, creating a TOC now will save you time. Why? Because Amazon requires all Kindle eBooks to have a TOC, which allows readers to easily navigate between chapters.

  1. Go to your blank page (TOC placeholder).

  2. Click Insert, Table of Contents, and Document. This will automatically generate your TOC.

    Insert a table of contents

  3. Select the checkboxes for all relevant paragraph styles that indicate a new chapter within the right-hand tab area. For example, Chapter Title.

    Select the paragraph styles that you want to include in the table of contents

  4. After all correct pages are being shown in the TOC, format the text to match your document and add a title to indicate that it is the TOC.

    Format the text of the table of contents
Tip: The TOC will automatically update as you continue to edit the document.


Step 10

Proof and export to PDF

Now that you’re done formatting, it's time to do a final check and adjust some settings to ensure that your file works with the KDP website. You should:

  • Proofread your manuscript using formatting symbols (paragraph marks)
  • Turn off downsampling to ensure that images are the highest resolution
  • Export (print) your file as a PDF


Turn on paragraph marks

In the main menu, click View then Show Invisibles.

Click the View tab and choose Show Invisibles to turn on paragraph marks


Downsample images

By default, Pages does not downsample images. Before you print to PDF, make sure that the images you imported are high resolution to avoid pixelation.


Print to PDF

  1. Go to File in the main menu and select Print then PDF...
  2. Choose Save as PDF from the drop-down menu.
  3. Click Save and save the file.

    Print to PDF by saving your file as a PDF


Was this article helpful? Yes | No

The survey is hosted by Qualtrics, so you'll visit their site to fill it out.

An unexpected error occurred. Please try again later.
Your session has expired

Please sign in to continue

Sign In
edit